Innokin Kroma 217 Mod Kit with the Z Force Tank Review
The Innokin Kroma 217 Z Force kit is a Direct-To-Lung (DTL) and Restricted-Direct-To-Lung (RDL) device, powered by a single external 18650/20700/21700 battery and fires up to 100W. It’s essentially a variable wattage/voltage mod but with Innokin’s Coil+ and Refresh technology, has the advantage of increasing flavor and prolonging the life of the coil.
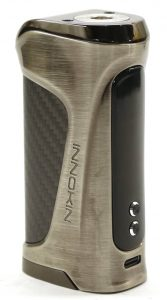
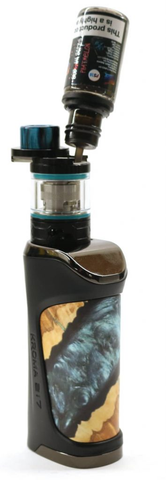
Innokin continue to use the Kroma name as we’ve seen in the previous series with the Kroma R and Kroma Z, including the Zlide tanks, but in my opinion the new Kroma 217 Z Force kit, even though reminiscent of those earlier kits, looks to be the best yet.
For a 21700 battery mod its compact, not overly heavy, it feels extremely solid and looks like it’s built to last. Maintaining that ergonomic and quality look and feel, the Kroma 217 I’m sure will be the talking point for a while to come.
Incorporated into the mod is the Type-C USB charging port and a 0.96inch colored OLED display screen with the now trademark concealed fire bar forming part of the display panel.
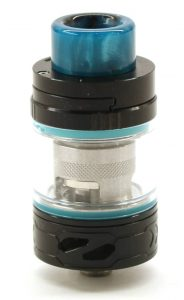
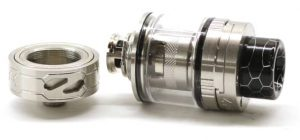
Coupled with the Kroma 217 is the newly released Z Force tank. It’s a slide to open top fill design with bottom adjustable dual slot airflow. It holds a maximum of 5ml (2ml EU version), has an 810 drip tip and accepts the range of Innokin’s brand new ZF DuoPrime Wicking coils.
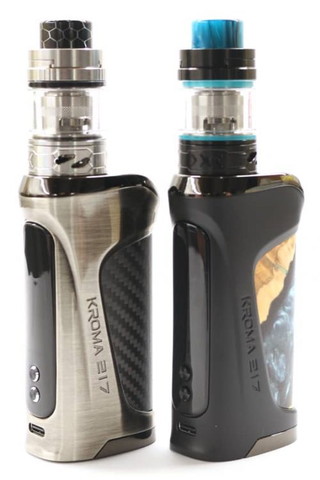
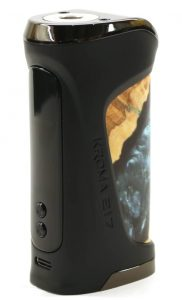
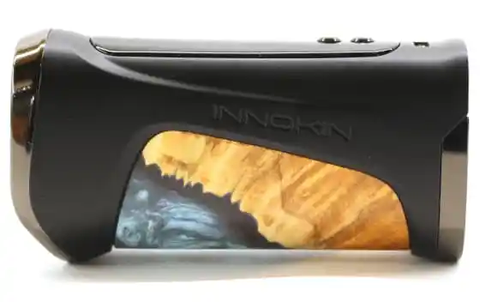
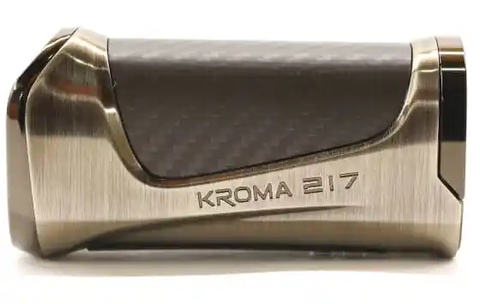
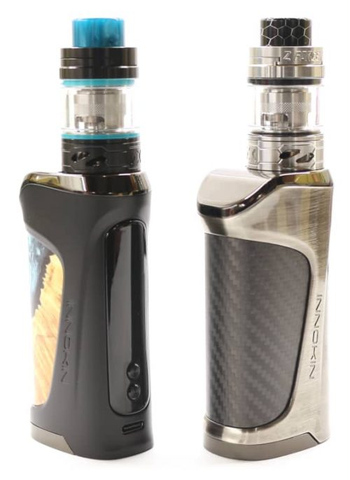
There are 5 different colors in the Innokin Kroma 217 Z Force kit range; River Wood, Mariana Blue, Stealth Black, Carbon Fibre and Glass Fibre. The frame of the Kroma 217 comes in 3 colors; Matte Black, Brushed Antique Gunmetal and Brushed Steel Silver. The Z Force tank comes in 2 colors; Matte Black and Stainless Steel with color matched 810 drip tips.
The two color variant kits we received were the River Wood and Carbon Fibre models which you will see in the photos throughout this review.
Carry on reading to see what we thought and get into the finer detail of the workings and performance.
Innokin Kroma 217 Z Force Mod Kit Review
Features and Specifications
Kroma 217 Mod
·Construction: Zinc Alloy
·Dimensions: 86mm (H) x 45mm (W) x 30mm (D)
·Weight: 145 grams (excluding battery)
·Charging: Type-C USB 5V/1.7A
·Resistance Range: 0.1 – 3.5 ohms
·Output Wattage: 6W-80W with an 18650 battery
·Output Wattage: 6W-100W with a 20700/21700 battery
·Input Voltage: 3.3-4.2V
·Output Voltage: 0.7V – 8.4V
·Output Current: 28.5A (18650) and 32A (2*700)
·Output Mode: Variable Wattage, Variable Voltage, Coil+, Refresh
·Battery Specification: Single 18650/20700/21700 external battery
·Chipset: 4th Gen Technology
·Display: OLED Color. Size not stated, measured as 0.96 inch
·Tank compatibility: 28mm max
·Cut-Off Time: 3-18 seconds adjustable
·Coil+ and Refresh Technology
Z Force Tank
·Construction: Stainless Steel/Pyrex Glass
·Dimensions: 46mm (L) x 24mm (D) excluding 510 thread
·Weight: 62.5 grams (including coil)
·E-Liquid Capacity: 5ml Bubble Glass (2ml Straight Glass TPD version)
·Coils: DuoPrime ZF Push Fit 0.2ohm and 0.3ohm
·Filling Method: Slide to open Top Fill
·Drip Tip: 810 Color Matched Resin
·Thread: 510 Connector
·Airflow: Bottom Dual Slot Variable
·Spring loaded Leak Proof Coil Change
The measurements of the Innokin Kroma 217W mod fitted with the Z Force tank fitted together are 131mm high with a combined weight of 250 grams including an 18650 battery inserted.
What’s in the box?
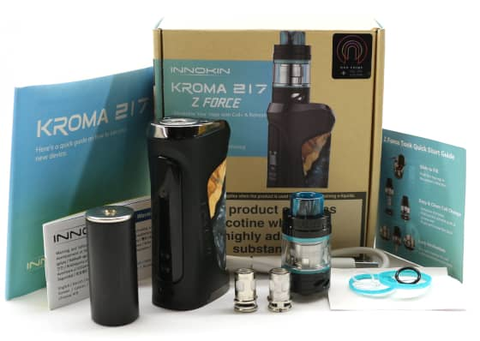
·Innokin Kroma 217 Mod
·Innokin Z Force Tank (5ml Standard/2ml TPD)
·ZF 0.2 ohm Coil (50W-80W pre-installed)
·ZF 0.3 ohm Coil (30W-45W)
·Type-C USB Charging Cable
·Spare O-Rings
·18650 Battery Adaptor
·User Manual
·Quick Start Guide
·Warranty Card

As is now standard with all Innokin products, the packaging that the Kroma 217 Z Force kit comes in is made out of 100% recyclable cardboard. This includes the spare coils and O-rings which are housed in thick paper sachets.
Innokin Kroma 217 Design and Appearance
The Innokin Kroma 217 mod is a single external battery device providing Variable Wattage from 6W-80W with an 18650 battery and 6W-100W when using a 20700/21700 battery. It’s also a Variable Voltage mod operating between 1V-7.5V but doesn’t include temperature control. Two further modes have been included, these being Coil+ and Refresh options which help in prolonging the life of the coil.
Coil+ will send a short pulse of current to the coil after every puff/draw to increase the lifespan of the coil, while Refresh is a selectable option that will apply a short burst of lower power (40%) either manually or automatically to help improve any muted flavor from the coil.


Overall dimensions of the Kroma 217 mod are 86mm high, 45mm wide and 30mm deep with the weight of the mod including the 18650 battery being 180 grams. It’s reasonably big for a single battery mod but understandably so as it also accepts the larger size 20700 and 21700 batteries.
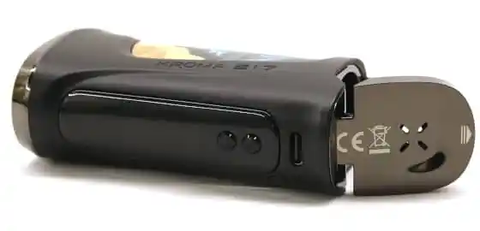
The single external battery is accessed via the bottom hinged sliding latch battery door. Opening the battery door is carried out by applying downward pressure to the finger plate recess and sliding forward in the direction of the printed arrow on the edge of the battery door.
This is a tight secure fit so will require a little pressure to open the door past its two locking latches. Closure of the door is achieved by reversing the process and sliding the battery door back into the two latches to lock into place. The latch mechanism feels very robust so shouldn’t cause any problems.

There are 4 oblong cut-outs shaped in a star formation in the finger recess of the battery door to safeguard against any possible battery venting issues. It’s always good to see manufacturers implement this practice as it really could stop major problems if the battery becomes stressed.
Orientation of the battery is clearly marked on the inside of the mod housing with a large red cross (+) polarity indicator inside the battery chamber and a negative (-) indicator on the battery door. This indicates that the battery is to be inserted positive end first.
The battery housing accepts a 20700/21700 size battery and will also allow an 18650 battery to be used in conjunction with the supplied 18650 battery adaptor. The battery adaptor is a decent length, has a magnetic positive tip and does fit extremely well.

On the top of the Kroma 217 mod is the threaded 510 connector plate which is very slightly raised from the main body to protect the attached tank from scratching the surface of the mod. 6 cross-cut lines are etched into the plate to assist with airflow from underneath the tank. The 510 pin is gold plated and spring loaded so accepts all standard 510 threaded tanks.
One third of the back top surface is angled at 450 which provides the perfect thumb rest when firing the mod and I did find this my preferred method of holding the Kroma 217 mod.
The area around the 510 connector plate on the top surface on the Kroma 217 are two small recessed hex screws and the overall surface diameter will allow for tanks up to 28mm in diameter. Any tank larger than this will overhang the frame.
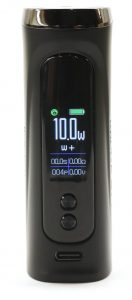
Control is achieved by the 4th generation chipset and the User Interface (UI) is an OLED colored display. There are no specifications on its size but does measure as a 0.96inch display. It’s located on the front of the Kroma 217 and interestingly forms part of the front facing fire plate (yes no fire button as such) which includes the small circular +/- buttons on a black gloss transparent finger plate.
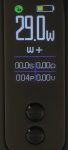
This display screen is clear and crisp showing the vaping mode you’re in (wattage/voltage/coil+), coil resistance, volts or wattage level, puff counter, vape duration, lock/unlock and the status of the battery.
The Kroma 217 mod is made out of high grade zinc alloy with the option of 3 different frame color finishes with a hand grip inlay made from premium grade materials including carbon fibre, glass fibre or leather. 5 different color and finishes are available to choose from. Do take a look at Innokin’s website at the different color range as they really do look striking.
Firing the mod is operated by pressing the top area of the display plate rather than the usual fire button and the two smaller +/- circular buttons increase/decrease the wattage/voltage. The response and feel of the buttons are very positive although there is a slight button rattle when shaken from the + and – buttons.
Charging the Kroma 217 mod can be carried out via the front located bottom edge Type-C USB port, specified as 5V/1.7A resulting in a reasonably quick charging time. The status of the charge cycle is really informative and I’ve included a detailed breakdown on what it displays in the How Do I Charge section later on it this review.
Innokin’s branding is discrete and kept to a minimum, with their name “INNOKIN” indented into the zinc alloy frame on one side and “Kroma 217” on the other side. The two mods supplied to me for review were the River Wild and Carbon Fibre colors and you can see how discrete the branding is from the included photos.
Accessing the menu structure is achieved by using a combination of the fire bar and the +/- buttons. More detail of the menus is described later on in the Functionality section.
With regards to safety features, the 4th generation chip provides the following prompts such as:
·3-18 seconds timeout (vape cut-off)
·Reverse battery protection
·Low battery voltage (3.3V)
·No coil/atomizer detected
·High temperature warning cut-off (90oC)
·Short circuit and low resistance cut-off.
Overall, the Innokin Kroma 217 mod feels very solid, very robust and extremely well built. It’s pretty compact considering it can take a 21700 battery, feels very comfortable to hold and is packing some weight which makes it feel very solid.
The bonus for me is the ability to take any of the 3 different size batteries and of course how Innokin continue to lead the way with innovative designs and technology with their Coil+ and Refresh design.
My only one slight niggle and I’m in two minds if it is even an issue, is when pressing the fire bar your thumb partially covers the display.
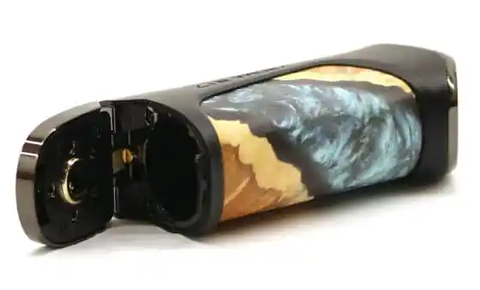
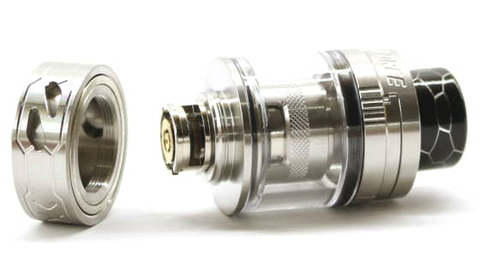
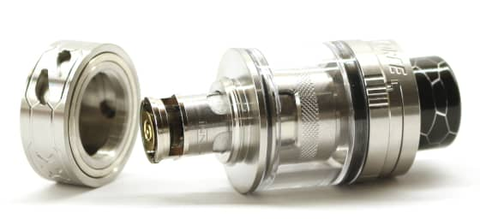
Innokin Z Force Tank Design and Appearance
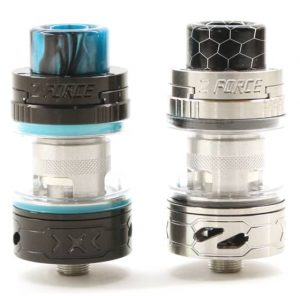
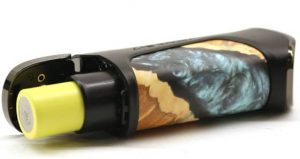
The Z Force tank is constructed out of stainless steel and pyrex glass. Dimensions are 51mm tall including the 810 drip tip and threaded 510 pin, 36mm tall excluding the 510 pin and drip tip. The width of the tank is 24mm in diameter and the weight, including the coil is 62.5 grams.
E-liquid capacity of the Z Force tank is 2ml with a straight glass (EU version) or 5ml with a bubble glass (standard version) and is a top fill design with a slide to open and close action. When open, there is a silicone rubber seal (membrane) enclosing the fill port opening, simply pass the tip of your e-liquid bottle through the seal to fill.
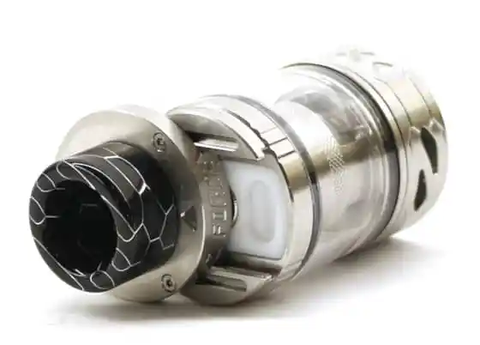
Indented into the sliding top fill cap is an arrow symbol indicating the direction that the top cap will slide to open. Either side of this arrow are two very small hex screws that locate into the two channels allowing for the smooth running of the sliding top cap.

The e-liquid fill port is a pretty decent size opening but depending on the type of e-liquid bottle you’re using, you may have to remove the 810 drip tip to gain better access to the fill port.
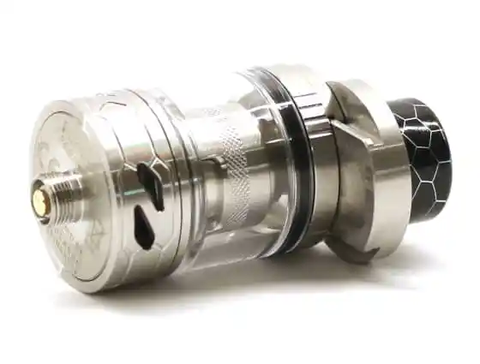
Removing the slide to fill section and the whole top cap is done by unscrewing anti-clockwise from the Pyrex glass. The male thread on the underside of the top cap screws into the female thread on the coil housing chimney. When the top cap is removed the Pyrex glass can be gently twisted off the bottom O-Ring seal. This glass fits either way round so no need to worry about its orientation.
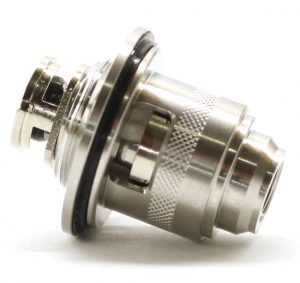
The chimney with the spring loaded juice flow control including the coil can then be unscrewed anti-clockwise from the bottom airflow control ring and 510 pin housing.
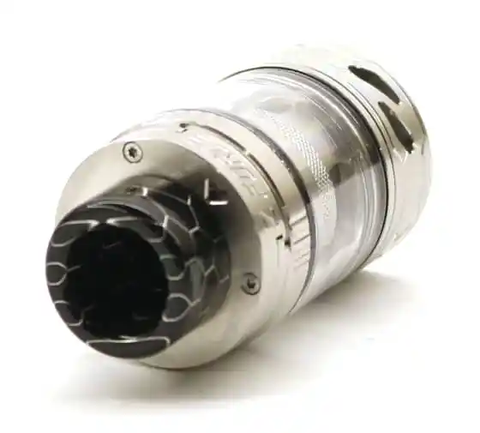
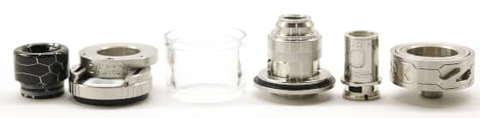
A color matched wide bore resin 810 removable drip tip securely fits into the top cap with 2 O-Rings ensuring it’s a very secure fit providing a DTL and RDL style vaping draw.
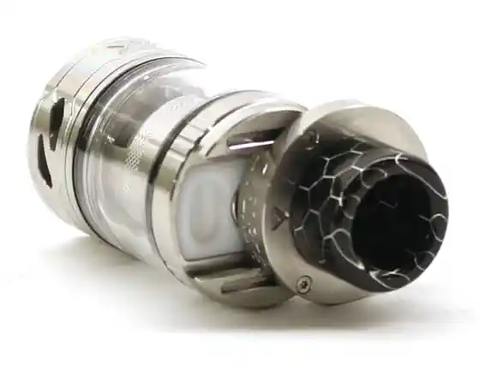
Airflow is achieved by the bottom quarter turn adjustable dual teardrop shaped double slots. The airflow can be adjusted anywhere from fully open which opens both the teardrop slots for a DTL draw or slowly closing it down to restrict the teardrop openings for a RDL vaping style. The resistance of the airflow ring is very good so will not inadvertently move unless you turn it.
I’ve not come across this shape of airflow slot before and have to admit it looks funky. I’ve called them teardrops because that’s the only type of shape that springs to mind.
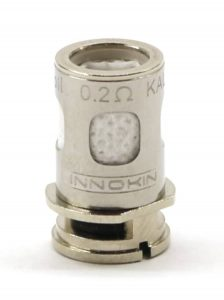
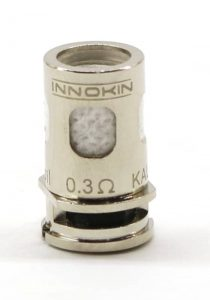
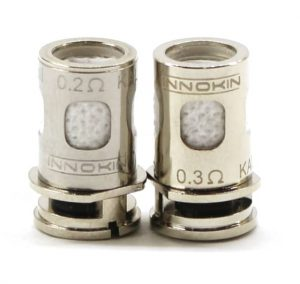
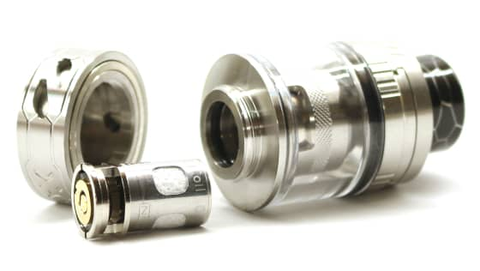
Unscrewing the bottom airflow ring anti-clockwise until it detaches from the tank gives access to the Innokin push fit ZF coil. Two coils are included in the Kroma 217 Z Force kit and are both KA1 (Kanthal) mesh;
·ZF 0.2 ohm coil: 50W-80W
·ZF 0.3 ohm coil: 30W-45W
Another of Innokin’s innovative designs are the new ZF coils which introduce DuoPrime Wicking. This revolutionary design incorporates a new outer mesh coil which increases the capillary action of the cotton wicking material, pulling e-liquid into the coil head, pre-heating it and directing it to the inner coil for vaporizing. This should create a more fully saturated and flavorful vape.
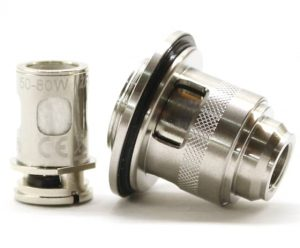
These coils do NOT screw in but are simply pushed into the bottom opening of the outer coil casing. As the coil is inserted, it locates against the spring loaded juice flow cut-off and will open as the coil is fully inserted. The circular lip with the two flat indents on the coil butt up against the base of the outer casing and stop the coil from being inserted further.
Strangely enough these two flat indents don’t locate anywhere so am unsure why they are there. My only thought is they are of the same design as the Z coils that fit in the Zenith II tank with had the corresponding indents in the tank outer coil housing.
There are no O-Rings on either of the 0.2ohm or 0.3ohm coils, instead the seal of the coil is performed by the O-Ring inside the outer casing. You can feel the resistance of the O-ring taking effect as the coil is pushed into the casing.

Removal of the coil is again pulled and NOT screwed from the tank. As the coil is removed, the spring loaded juice control will start to spring shut blocking off any e-liquid flow.
Branding is minimal with the words “Z FORCE” etched into the front facing sliding fill port opening cap in-between the two hex screws. Also the usual CE markings, along with “DESIGNED BY P.BUSARDO VAPINGGREEK” and “PLATFORM ZF SERIES” are etched into the bottom of the 510 pin base plate.
Stripping down the Z Force tank is straight-forward and disassembles into 6 parts including the coil and 810 drip tip for easy cleaning and maintenance. Lots of spare O-Rings are included in the kit if any on the tank get damaged or lost.
Overall I really am impressed with the design and machining of the threads and the quality feel of the Z Force tank. I’ve not mentioned this before but there are very discrete engravings on the airflow control ring that just adds to the look of the tank.
The sliding top fill works really well and the self-closing silicone fill port is good. The spring loaded juice cut-off is a great idea allowing the coil to be removed from the tank while it’s filled with e-liquid with no spillage.
It feels solid and can be completely stripped down into each individual section. I really do hope it performs as well as it looks and feels. I have high hopes for the new Duo Prime wicking coils.
Innokin Kroma 217 Functionality

The Innokin Kroma 217 mod has a 0.96 inch colored display to show all of the set parameters. Included on the 0.96 inch colored display is all of the read-out information as follows:
·Battery level indicator: Color changing bar
·Coil + / Wattage / Voltage selected
·Wattage / Voltage levels
·Lock / Unlock
·A smaller Wattage/Voltage reading (opposite to what’s been selected)
·Coil resistance reading
·Puff counter
·Vaping time reading
Changes to these parameters are carried out by sequential presses of the fire bar and the + and – buttons.
Basic Operation
·Fire bar pressed 3 times turns the device on or off
·Fire bar and + button shows battery charge, coil resistance and puff counter
·Hold + button till display flashes, then press + button to increase the wattage or voltage
·Hold – button till display flashes, then press – button to decrease the wattage or voltage
·Fire bar and – button will lock/unlock the device (fire bar still fires)
·+ and – buttons together will enter the menu options
Menu Options
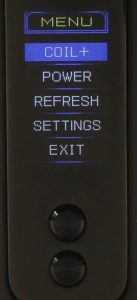
To access the main menu of the Kroma 217, press the + and – buttons together and the following parameters will be displayed. Use the – button to scroll down to the menu you want to enter which will be highlighted in blue.
·Coil + mode: available in Wattage or Voltage mode
·Power mode: + or – button to select Wattage or Voltage, fire bar to select
·Refresh mode: + or – button to select Auto or Manual Refresh
·Settings mode: set Timeout, set Cut-Off, Device ID, Reset, Exit
·Exit
Settings Sub Menu

After pressing both the + and – buttons together to enter the main menu display, use the – button to scroll down to the “Settings” menu. Press the fire bar and the following information will be displayed:
·Timeout: 5 seconds to 180 seconds
·Cut-off: 3 seconds to 18 seconds
·Device ID: Current code
·Reset: Confirm or Back
·Exit
Status Menu
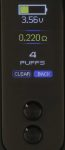
Pressing the Fire bar and the + button simultaneously will take you to the status menu where you can read the status of the battery, the resistance of the coil that’s fitted in the Z Force tank and the Puff Counter.
·Battery color changing icon bar
·Numerical value of the remaining battery charge
·Resistance reading of the fitted coil
·Puff counter: Number of puffs and Clear function
While the supplied Kroma 217 manual covers the basic functions and menus, we’ve included a detailed description of some of the operations for greater clarity.
Powering up the Kroma 217 mod
When you first install the battery and press the fire bar, the display screen will display a blue spiral circle with a message below saying “Click 3 X Power On”.
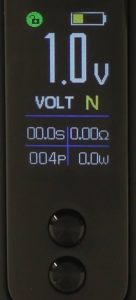
Pressing the fire bar 3 times will power the Kroma 217 up in a default mode of Wattage with a power level of 10.0W and the Coil+ enabled. This is confirmed by the display indicating “W+”.
Increasing/Decreasing the Wattage/Voltage Level
As seen on some other Innokin devices, pressing the + or – button will initially have no effect in decreasing or increasing the wattage/voltage levels. If you want to increase or decrease the power levels, you will first have to hold down either the + or – button until the numerical power level flashes.
Once the display starts to flash, release the button and then press the button again. This will now increment or decrease, depending on which button you’re pressing, the wattage in 0.5W increments from 6W–20W then 1W increments from 20W to its maximum and the voltage in 0.1V increments.
The +/- buttons do a round robin so when you reach the maximum value, the next press will take you to the minimum value. Equally, this will also work when you’re at the minimum value, the next single press of the – button will take you to the maximum value.
Holding either of the + or – buttons down continuously will scroll through the available wattage/voltage range a lot quicker until it reaches the minimum or maximum value. It will remain at that value for 1 second then cycle again until you release the button.
Power Mode
Press and hold the + and – buttons simultaneously to enter the menu mode. Scroll down to “POWER” and press the fire bar. This will enter the sub menu of Wattage or Voltage. Select the mode you want using either the + or – button and press the fire bar again.

This brings up the next sub menu of Soft, Norm or Hard. Use the + or – button to scroll through the setting you wish and press the fire bar to select that option.
The main display will indicate the mode that’s been selected with either Watt or Volt displayed just under the numerical value with N, S or H displayed to the right which donates which of the 3 sub menu options you chose.
If you’ve selected “Wattage”, the large numerical display will indicate “Watts” and the smaller bottom right value (underneath the coil resistance) will display the voltage that’s being applied to the coil.
If you’ve selected “Voltage”, the large numerical display will indicate “Volts” and the smaller bottom right value (underneath the coil resistance) will display the wattage that’s being applied to the coil.
Refresh Mode
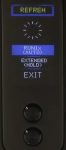
Selecting this mode will enable you to automatically or manually select this operation when the flavor from your coil starts to become muted. This mode will in effect apply a lower value pulse, (40%) to what you’ve selected to vape at, to the coil to help refresh the coil by pulling e-liquid through the coil.
There are two options to choose from, an Auto mode that will run once for a couple of seconds or a Manual Hold mode that you run for a longer period.
Coil+ Mode

This mode will send a pulse of current through your coil at the end of every puff to increase your coil’s lifespan. Selecting Coil+ mode works in both Wattage and Voltage modes but once selected the option of Soft, Normal or Hard is NOT available.
When Coil+ mode is selected, the main display will indicate wattage + (W+) or voltage + (V+) below the large numerical values. When Coil+ is disabled and normal power mode is selected, the “+” sign is omitted and replaced by the Soft (S), Normal (N) or Hard (H) letter beside the wattage (Watt) or voltage (Volt) that’s been selected.
Screen Timeout
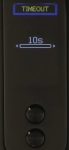
When selecting this menu, you can specify the length of time the screen will be displayed after pressing any of the buttons.
The default setting is 10 seconds, but you can select a value from between 5 seconds – 180 seconds.
This value will determine how long the screen will remain illuminated before it goes blank if no button is pressed.
Cut-Off
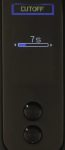
The default setting for this is 10 seconds. You can select any value from 3 seconds to 18 seconds.
When you press and hold the fire bar to vape, the current that’s applied to the coil will remain for the duration that’s been specified in the CUT-OFF menu or sooner if you stop pressing the fire bar.
This is a safety feature to stop accidental prolonged firing of the device. When the time is reached in the CUTOFF menu, the display will indicated “CUTOFF” and will stop firing.
Overall Menu Detail
The menu structure of the Kroma 217 is straightforward to use and well laid out. The level of detail is really good and looks like a lot of thought has gone into the design and layout. I like that the main display of the Kroma 217 highlights what’s been selected.
Innokin Z Force Tank Performance
Two coils are supplied with the Kroma 217 kit (0.2ohm and 0.3ohm) and are both Kanthal A1 mesh with cotton wick which include the DuoPrime Wicking technology. The Kroma 217 only operates in wattage or voltage mode, there is no Temperature Control (TC) feature option.
ZF 0.2 Ohm Coil
Innokin specify the wattage range is between 50W-80W.
After priming and slowly bedding in the coil at a low wattage, I found the flavor and vapor started to kick in for me at around 30W. Slowly increasing the wattage up to 50W really did improve the flavor and vapor produced.
My sweet spot for this coil was around 55W in terms of great flavor and vapor production. With the airflow 1/2 open I was getting a really decent RDL vape style. Opening the airflow made the draw lest restricted with really good dense vapor and for me the perfect vape.
Surprisingly the vape remained reasonably cool at this wattage which I liked but there was a little turbulence (noise) on the draw.
Taking the wattage on this coil up to 80W to see how it would perform increased the vapor at which point I was instructed to leave the room by the missus! After about 5 minutes at this wattage I returned to around 50W but can say the wicking ports kept up really well with no dry burns.
I’ve cycled around 80ml so far through this coil (lots of refills….Damm TPD) and the flavor is impressive. Yes it does drink e-liquid but I really like the tank. I will definitely look for a replacement 5ml bubble glass.
ZF 0.3 Ohm Coil
Innokin specify the wattage range is between 30W-45W.
Once primed and bedded in, the flavor and vapor started to appear at around 15W. Increasing the wattage to 25W really started to bring out the flavor of my e-liquid and was producing quite decent vapor.
Settling at 35W with the airflow half open seemed to give me the best results for this coil. Flavor was really good and again really decent vapor.
Flavor wise this coil really did perform very well and was on par with the 0.2ohm coil.
Taking the wattage up to the maximum recommended 45W worked good with no dry hits just more vapor.
I’ve been vaping this coil for the last two weeks, reducing the wattage down to 28W and I really can’t fault it. There is no sign of flavor drop off at all.
Coil+ and Refresh Results
It’s quite difficult to gauge over a relatively short time if Coil+ improves the coil life as there are so many different factors involved. The principle behind the technology makes sense so I can only assume it will do. I’ve been using the 0.2ohm coil in Coil+ mode and the 0.3ohm in standard wattage mode with both coils still working faultlessly.
With regards to Refresh, I’ve been using both coils now for approximately two weeks and have to say the flavor is as crisp as it was when I first started using them. I’ve not had to refresh either of the coils yet.
What I can say is that this feature is on the Coolfire Z80 which we reviewed a while ago and after using the refresh mode on a muted coil, the flavor did return for a little while longer.
Any Leaks?
Throughout my time using the Z Force tank there was no evidence of any leaks when using either of the supplied coils. Obviously as the coils get older leaking can start to occur and is a good gauge that it’s time to replace the coil.
The juice auto shut-off when removing the coil from the tank with e-liquid still in the tank DID work.
ZF Coil Summary
Both the 0.2 ohm and 0.3 ohm ZF coils are really impressive. Flavor and vapor from them is really good and feel that the DuoPrime mesh and wicking works very well.
The wicking ports kept up with High VG juice and equally well with my 50/50 e-liquid.
Innokin Kroma 217 Battery Performance
The Innokin Kroma 217 can be powered by a single 18650 battery when using the 18650 battery adaptor or powered by either a 20700 or 21700 size battery.
Battery performance is always subjective and depends on the type of battery you use and its condition, the power you vape at, the type of coil you’re using and your vaping style.
I opted to use my 18650 Sony VCT5A battery (25A/2600mAh) as I was vaping at a constant 30W on the 0.3 ohm coil and was getting around 8 hours vaping before I needed to re-charge. Switching in the 0.2 ohm coil and vaping at a constant 50W decreased my vaping time before needing to re-charge to 6 hours.
Changing the battery to a Molicel 21700 P42A, having a 4200mAh rating, increased my vaping time between charges on both coils as you would expect due to the increased battery capacity.
The Kroma 217 indicates the status of the battery on its display so you can keep an eye on the remaining charge of your battery. The battery icon will change color and reduce in size as the charge diminishes.
Alternatively you can press the Fire bar and + button simultaneously which will show the battery icon with its appropriate charge color with a numerical voltage value below it.
Once the battery is depleted of its charge as depicted by the low voltage cut-off value of 3.3V, the Kroma 217 mod will flash up a “Low Voltage” prompt on the display.
If you want to ensure you’re using the right capacity battery for the wattage you’re intending to vape at, you can use our Battery Amp Drain calculator to determine the most suitable battery for your vaping requirements.
The Z Force sub ohm tank is a top filling slide to open mechanism, it really is very easy to fill.
You don’t remove the top cap, just simply slide the top cap in the direction of the indented arrow symbol that’s on the top cap in-between the two hex screws and above the “Z Force” branding.
Once the top cap slides open, the fill port with its white silicone rubber membrane seal will become visible. Pass the tip of your e-liquid bottle through the opening of the silicone rubber seal and fill the Z Force tank with your e-liquid.
Once filled, remove the e-liquid bottle from the filling port and slide the top cap back into position ensuring the white silicone seal is no longer visible.
Quick Tip: If you are filling the tank for the first time, drip a few drops of e liquid onto the wick of the coil first. Push the coil into the base of the tank then fill and leave to stand for approx. 10-15 minutes before you start to vape. This will help saturate the wick fully in e-liquid and help prolong the life of your coil.
How do I Change the Coil in the Z Force Tank?
Unscrew the Z Force tank from the Kroma 217 mod. Because the Z Force tank incorporates a spring loaded juice shutoff mechanism, the coil can be removed from the tank even if the tank is full of e-liquid.
Grasp the main body of the tank and turn the bottom airflow control ring to fully close the airflow. Continue turning to slowly unscrew the bottom section of the tank until it comes away from the glass and top section. This will give access to the ZF coil.
The Z Force ZF coils are of a push fit type therefore simply pull the coil away out of the tank. While the coil is being removed, the spring loaded juice shutoff will start to close shut blocking the flow of e-liquid from the tank.
Fitting a new coil is straightforward. Slowly push the coil into the opening and as it slides into the tank section it will slowly open the spring loaded juice mechanism allowing the e-liquid to once again saturate the wicking in the coil.
Push the coil fully home until the lip on the coil with the two flat indents sits up against the screw thread on the bottom of the tank.
Interestingly, the two flat indents on the coil don’t locate with any indents on the tank. We first came across indents like these on the Z series of coils when we reviewed the Coolfire Z80 with the Zenith II tank.
Re-connect the airflow base section to the main tank body and carefully screw the two sections together. Make sure you don’t over-tighten but making a firm seal. Adjust the airflow ring to your desired setting.
Do ensure that your new coil is primed and when filled, left to stand for 15 minutes so the e-liquid fully saturates the wick. See our guide on Prolonging the Life of your Coil.
How do I Charge the Innokin Kroma 217?
As with most external battery mods, there are 2 ways which you can charge the battery. Either in the mod itself or using an external charger (recommended).
If you do wish to charge your battery in the mod, the Kroma 217 has a bottom front located Type-C USB port just below the +/- buttons.
A Type-C USB charging cable comes supplied with the kit. Simply connect the cable into the Type-C port on the bottom front of the Kroma 217 mod and the other end into a suitable USB power source. The specified charging circuit of the Kroma 217 is 5V/1.7A.

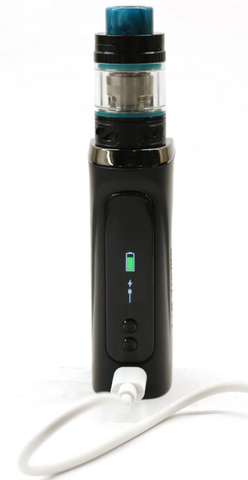
When the Kroma 217 mod is first placed on charge, the small battery icon on the main screen display will cycle from red to yellow to green indicating that it’s charging. After the screen timeout period, the display will switch to a larger battery screen display which shows a graphical power lead, the USB symbol and the battery icon with a cycling color scale.
·Red: Battery charge at <10%
·Yellow: Battery charge between 10%-60%
·Green: Battery charge >60%
The battery icon remains visible throughout the charging cycle and will turn static green once it reaches 90% of its charge. It will continue charging until it reaches full charge at which point the battery display will extinguish.
Pressing the fire bar and + button simultaneously will take you to the status menu where you can see the numerical charge value of the battery which should read 4.2V when fully charged.
A Pass-Through function is included allowing you to charge and vape at the same time.
Charging time from full discharge to fully charged will take approximately 1.5 hours when using a 5V/1.7A source. This will vary depending on the capacity of the battery you’re using. For reference, the battery i tested this with was an LG 2500mAh 18650.
While the Kroma 217 mod is on charge, even though the mod remains cool, I would strongly recommend to ONLY charge the mod on a non-flammable surface.
As with any vape device, NEVER leave your mod unattended whilst charging.
If you prefer to charge your battery externally and I really would recommend doing this.
Innokin Kroma 217 Z Force Kit Price
At the time of writing, the Kroma 217 Z Force kit was on pre-order so the cost is to be determined.
Expect to pay on average around the £50/$60 mark for the Innokin Kroma 217 Z Force kit. Depending where you purchase this could go up or down.
Considering the quality and performance I found while reviewing this kit, I honestly do feel you would not be disappointed if you purchased one. Both the mod and the tank are up there with the best of them. Paired together in the kit then what’s not to like.
Innokin Kroma 217 Z Force Kit Verdict
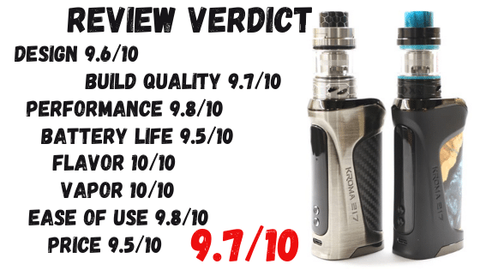
Pros
·Excellent build quality
·Great design and nice looking
·Clear and crisp OLED display
·Type-C USB fast charge
·Coil+ and Refresh
·18650/20700/21700 battery option
·Fantastic Z Force tank
·Terrific vapor and flavor
·Coil life is really good
·DuoPrime mesh and wicking
·Leak free coil change
·Pass-thru vaping
Cons
I really am struggling to find anything I don’t like about the Kroma 217 Z Force kit but if I’m being really picky then:
·Slight rattle from the + and – buttons
·Battery door tight to open
·No temperature control
Innokin Kroma 217 Z Force Kit Summary
The Innokin Kroma 217 Z Force kit really is stunning. I like it…I really like it a lot.
It doesn’t have modes such as Temperature Control or Variable Power Curve so it might not suit all vapers but as a very well designed and very well built kit with the increased size to accept a 21700 battery if required is great.
The size and weight fit perfect in the hand and the fire bar provides an ideal method of activating the device.
Coil+ and Refresh modes will improve the longevity of your coil and the ZF DuoPrime coils produce fantastic results.
The Innokin Z Force really is a very good DTL/RDL tank. The machining is really good and it feels very solid. Performance from both the supplied coils in the kit was fantastic in terms of flavor and longevity. Do note, this is a DTL kit so wont suit those folk that prefer MTL vaping.
Combining the Z Force tank with the Kroma 217 mod is a perfect fit.
I was expecting good things to come when I started to use and review the Kroma 217 Z Force kit and I definitely wasn’t disappointed. Have I mentioned I really like it!
I would certainly recommend both the Kroma 217 mod and the Z Force tank as individual items but combined as a kit you get the best of both worlds. Innokin have again produced another winner and haven’t overly complicated it with too many advanced modes that can confuse matters.
The new Kroma 217 Z Force kit has taken an already proven design of the earlier releases of Kroma and made it even better.
Hope you enjoyed this review on the Innokin Kroma 217 Z Force kit and found it useful.